If you’ve configured Cloudflare CDN for your website and noticed that your outgoing emails stopped working, you’re not alone. This is a common issue that many users face due to DNS misconfigurations. In this blog post, we will guide you through the process of troubleshooting and fixing outgoing email problems caused by Cloudflare CDN. By the end of this guide, your email should be functioning correctly again.
Common Symptoms
- Emails are not being sent.
- You receive error messages from your email client.
- Emails are stuck in the outbox.
Root Cause
When you set up Cloudflare CDN, it changes your DNS settings to route traffic through its network. This can sometimes lead to misconfigured DNS records, especially for email services. The key to solving this problem is to ensure that your DNS records, particularly the SPF, DKIM, and DMARC records, are correctly set up for your email provider.
Step-by-Step Solution
1. Verify SPF Record
Ensure that your SPF (Sender Policy Framework) record includes the necessary information for your mail server. For Google Workspace, the SPF record should look like this:
v=spf1 include:_spf.google.com ~all
- Log in to Cloudflare.
- Navigate to the DNS section for your domain.
- Look for a TXT record with the value starting with
v=spf1. - If it’s not there, add a new TXT record with the following details:
- Name:
@ - Type:
TXT - Value:
v=spf1 include:_spf.google.com ~all
- Name:
- Save the record.
2. Add DKIM Record
DKIM (DomainKeys Identified Mail) helps to prevent email spoofing. You need to add a DKIM record provided by your email service provider.
- Log in to your Google Workspace admin console.
- Navigate to
Apps>Google Workspace>Gmail>Authenticate Email. - Follow the steps to generate the DKIM key.
- In Cloudflare, add a new TXT record with the following details:
- Name:
google._domainkey - Type:
TXT - Value: The DKIM key provided by Google Workspace.
- Name:
- Save the record.
3. Add DMARC Record
A DMARC (Domain-based Message Authentication, Reporting, and Conformance) record is recommended for email security.
- In Cloudflare, add a new TXT record with the following details:
- Name:
_dmarc - Type:
TXT - Value:
v=DMARC1; p=none; rua=mailto:postmaster@yourdomain.com; ruf=mailto:postmaster@yourdomain.com; sp=none; aspf=r;
- Name:
- Save the record.
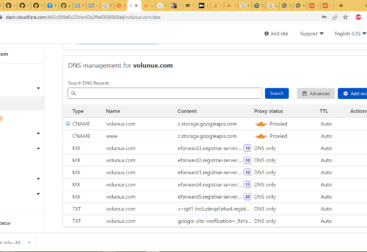
4. Ensure Mail-related DNS Records are Not Proxied
Make sure that the DNS records related to email (such as the A record for mail.yourdomain.com) are not proxied through Cloudflare. These records should be set to “DNS only” (gray cloud icon).
- In Cloudflare, find the A record for
mail. - Click “Edit”.
- Change the proxy status to “DNS only” (gray cloud icon).
- Save the changes.
5. Verify SMTP Settings
Make sure your email client is configured with the following SMTP settings for Google Workspace:
- SMTP Server:
smtp.gmail.com - Port: 587 (with STARTTLS) or 465 (with SSL/TLS)
- Authentication: Yes
- Username: Your full Google Workspace email address
- Password: Your Google Workspace account password or app-specific password if 2-step verification is enabled
Conclusion
By following these steps, you should be able to resolve outgoing email issues caused by incorrect DNS settings in Cloudflare. Ensuring that your SPF, DKIM, and DMARC records are correctly set up and that email-related DNS records are not proxied through Cloudflare is key to maintaining proper email functionality. If you continue to experience issues, consider reaching out to your email service provider for further assistance.